

Summary:In this article, we will discuss how the user can export Outlook for Mac to PST. We also discuss the expert approach which makes to Export Outlook for Mac 2016 to Windows Outlook.
Common Reasons to Export Outlook for Mac 2016 to Windows Outlook
- Users need to access all OLM files on Outlook for Windows
- Need to migrate all the data from Mac Outlook to Windows Outlook.
Note: Outlook for Mac stores all the data in an OLM file format whereas Windows Outlook preserves all the data in PST file format.
Topics Covered in the Blog
- Step 1: Convert your OLM file into Archive File
- Step 2: Gmail setup in Mac Outlook Note:
- Step 3: Migrate Mac Outlook data to Gmail
- Step 4: Move all the OLM data from Gmail to Outlook PST
- Expert Method
- Import the PST file into Windows Outlook
How to Export Outlook for Mac 2016 to Windows Outlook Manually?
Warning: The manual method is complicated and time-consuming too due to this user may skip some steps during conversion. So we also provide you the expert method which converts all the data of Outlook for Mac 2016 to Windows in a few steps and without any extra efforts. Following are the steps to export Outlook for Mac 2016 to Windows Outlook manually:
Step 1: Convert your OLM file into Archive File
- Launch Outlook in your Mac machine, navigate the Tool tabs and hit the Export button
- An Export to Archive File (.olm ) window will appear, check the checkbox of the items which you want to export
- A dialog box will appear, provide the specified name and location where you want to save your file
- Outlook start exporting the selected data, hit the Finish button after the process is completed
All the items which you have selected will preserve in an archive .olm file at the specified location.
Step 2: Gmail setup in Mac Outlook Note: You need to enable IMAP setting before preceding the further steps
- Launch Outlook for Mac application, navigate Outlook > Preferences
- An Outlook Preference window will appear, select Accounts under Personal Settings
- Account Window will appear, hit the + sign in the left corner, choose E-mail from the drop-down menu
- In the next window enter your Gmail account credentials and hit Add Account
- Your Gmail Account will be added to your Outlook
Step 3: Migrate Mac Outlook data to Gmail
- Right-click the newly added Gmail folder in Outlook 2016, and choose New Folder
- You need to rename the selected folder and navigate the File menu, choose Import
- Select the mailbox folder you need to migrate. Right-click all the items from the selected folder and go to Move > Choose Folder
- Browse the Gmail folder and click Copy
Now all your OLM file data will migrate in the new Gmail folder.
Step 4: Move all the OLM data from Gmail to Outlook PST
- Launch Window Outlook application, and configure your Gmail account which you have set up in Mac Outlook
- Go to the File > Open & Export > Import/Export
- An Import and Export wizard will appear, select Export to a file option Choose Outlook Data File(.pst), and hit Next
- An Export Outlook Data File window display, choose Gmail folder that includes OLM file data, click Next
- Browse the location for your Outlook data file (.pst) and hit Finish
You can access all your OLM data files in Windows Outlook
Consequences of the Manual Method
While exporting Outlook for Mac to PST manually has some consequences are listed below:
- Always requires Gmail configuration.
- Complicated to understand and time-consuming.
- User need to have a technical knowledge.
- The data may be lost during conversion.
Export Outlook for Mac 2016 to Windows Outlook by Automated Tool
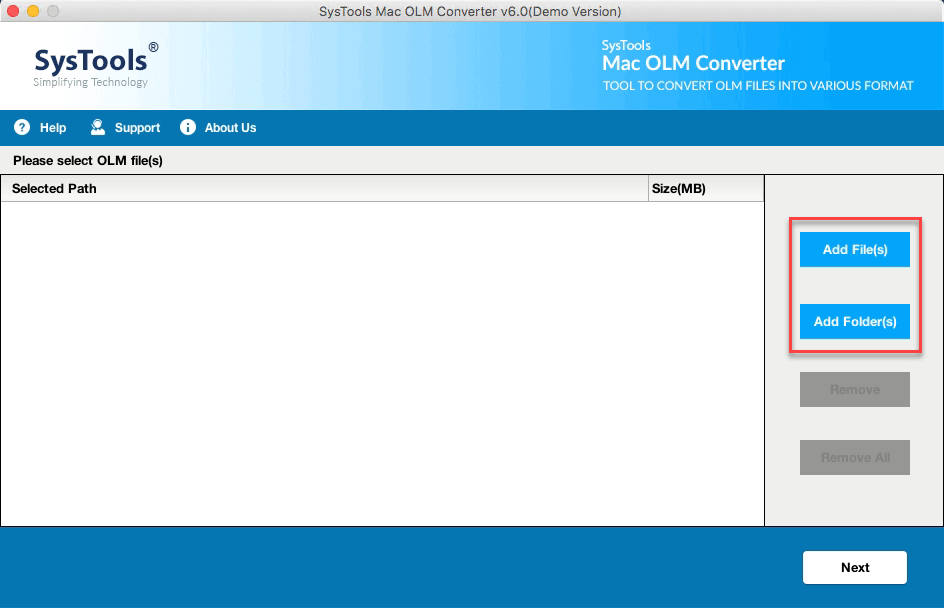
- Download and launch Outlook for Mac 2016 Archive Tool
-
- Hit the Add file button to Add OLM file
-
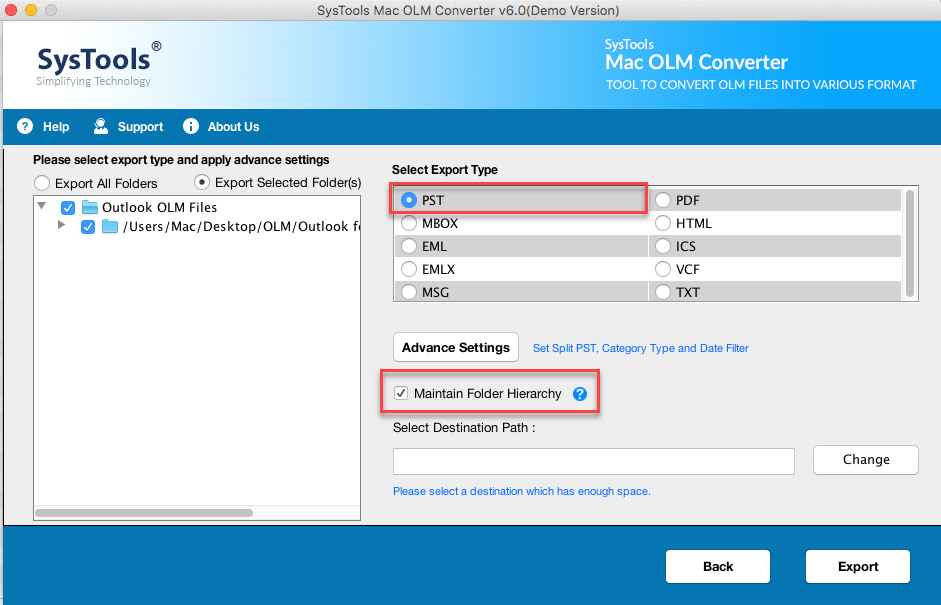
- Select PST file format from the list
-
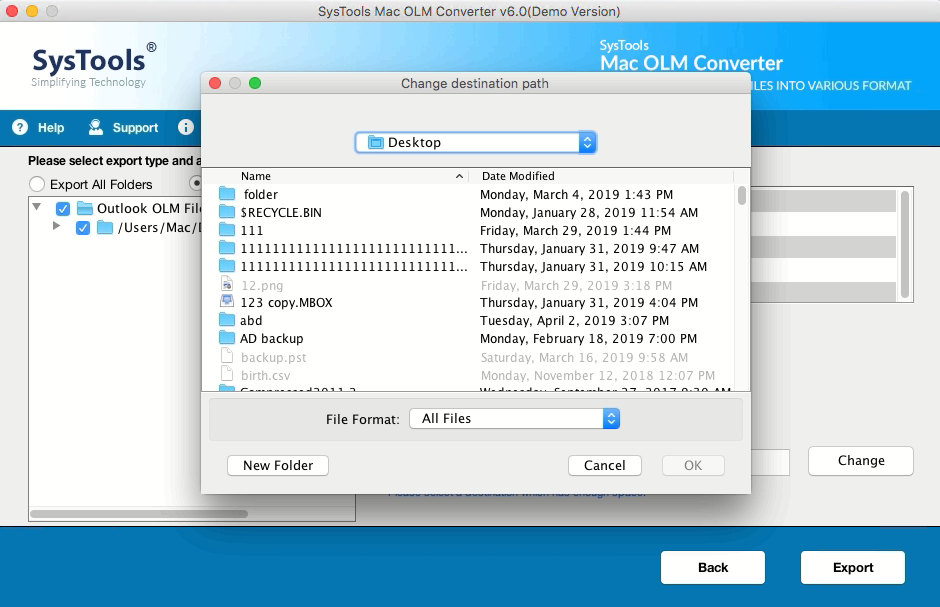
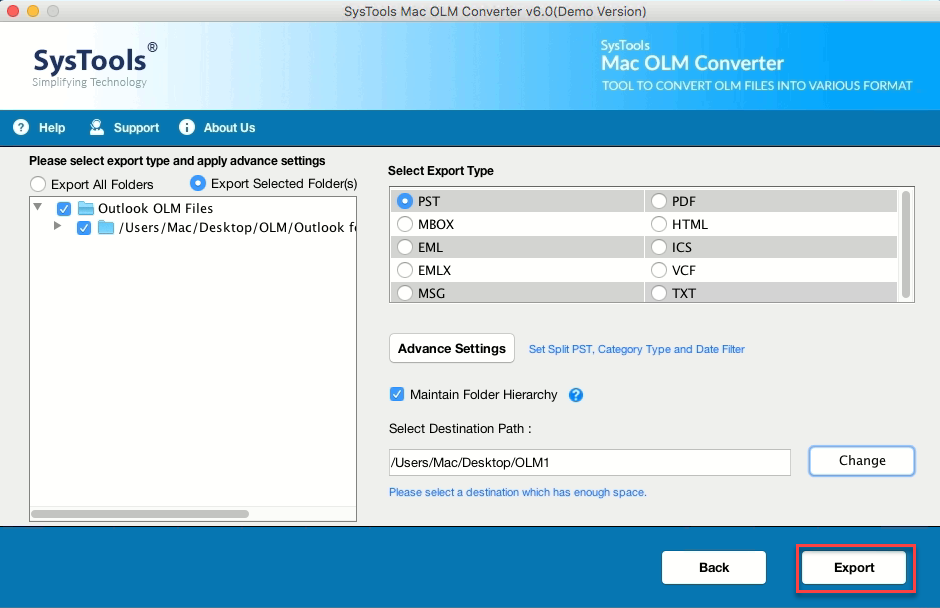
- Locate the destination for your PST file
-
- Click on Export button to start button.
- Wait till the exportation process completed.
By this step, all your OLM files are exported in PST file format
Import the PST file into Windows Outlook
Browse your converted PST file and follow the given steps:
- Launch Windows Outlook and navigate the File option
- Choose Import/Export option to add your PST file
- Select Import from another program or file and hit the Next button
- Open your PST file from the folder
- Click on the Finish button and initiate the importing process
Conclusion
This article clears that how one can easily export Outlook for Mac 2016 to Windows Outlook without any technical knowledge. In this blog, we have discussed both the methods to export Outlook for Mac to PST in a trouble free manner.