

Microsoft always looks for new strategies to process MS Outlook emailing more effectively. It takes care of each and every aspect to provide best service. Along with many other advance features it also provides a very useful function to manage and organize emails using Rules. Different types of rules can be set on the emails for e.g. a rule can place entire emails from a distribution list to a target folder to filter it out. This section will discuss about the mechanism of Rule function in various versions of MS Outlook.
How Can Be Outlook Rule Defined?
MS Outlook rules can be defined as set of automatic actions upon incoming or outgoing messages which is predefined by the user.
As mentioned, it is an automatic action and is completely based on the specifications you have provided. You can provide many specifications/conditions using Rule wizard and Outlook will apply it to emails when they arrive or are being sent.
Rule Wizard provides following Templates with rules;
- Stay Organized: This contributes set of rules for email messages from specific sender with specific word or phrase in subject to be moved to certain folder.
- Stay Up to Date: This alerts you when you have received specific message which has been defined by you. You get a visual or sound alert. You can also create rule to send alert to your mobile device when that message arrives.
- Start from Blank Rule: This rule is just like other rule but it is not created with help of predefined Template. It is blank and you can customize it fully.
How Can Rules Help You?
Consider you have piles of email messages in your Inbox and you need few messages from your colleague. At that time searching for particular email can become hectic. You can instead use these rules and filter out the coming emails in advance. This provides better sorting and a much better email management. Once Rule is set you can;
- Assign particular category or flag emails received from Manager.
- Automatically forward mails from your junior “ABC” to Manager once they arrive in your INBOX.
- Move emails with specific subject or word in the subject to certain folder.
How to Create a Rule?
For MS Outlook 2003 and 2007 Users
Step 1: Users of MS Outlook 2007 and 2003 can go to the; Menu >> Tools>> Rules and Alerts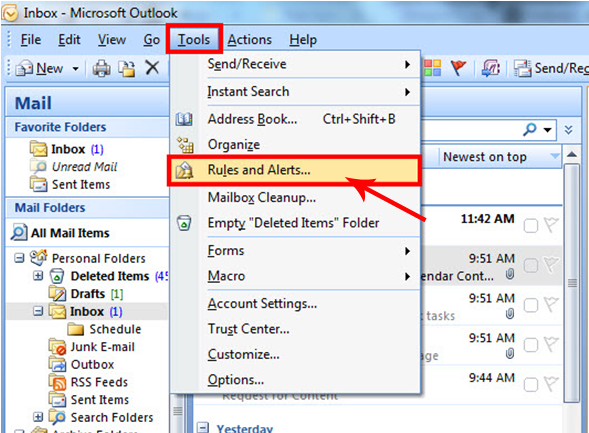
For MS Outlook 2010 and 2013 Users
Step 1: For MS Outlook of advance versions go to; Home>>Move>>Rules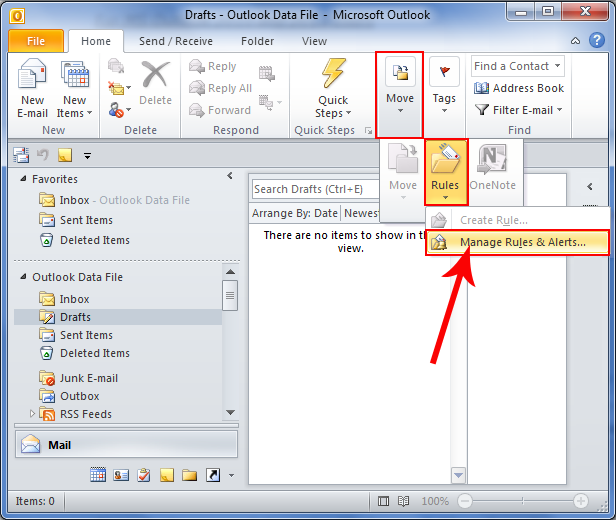
Step 2: Once you click on the “Manage Rules & Alerts” another window pops up. Here select “New Rule” to create a new rule and specify its conditions.
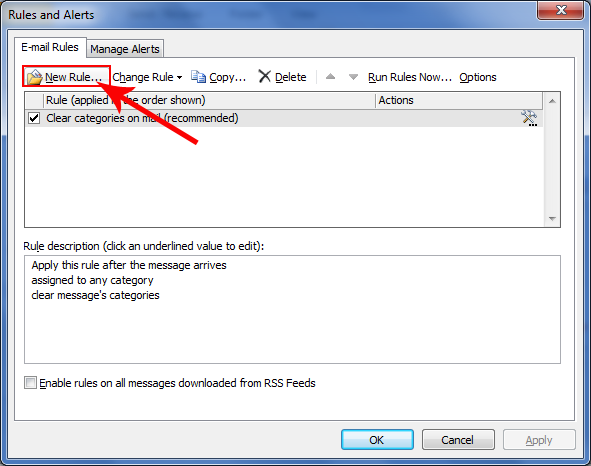
Note: You can also Change Rule, Copy, Delete, Import/Export suing same option. These options are available besides the New Rule option.
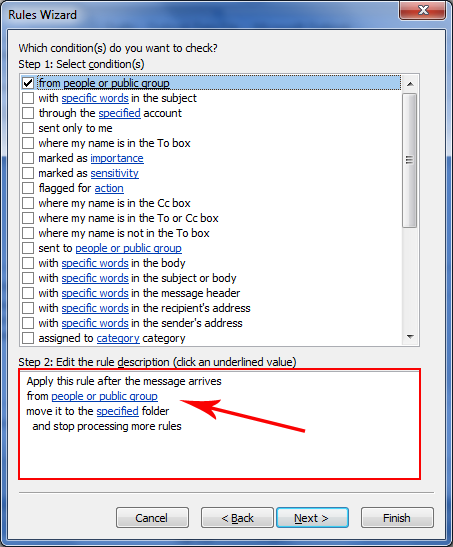
Step 3: This will pop up another window “Rules wizard” with some set of conditions. You can use these conditions to create the new Rule.
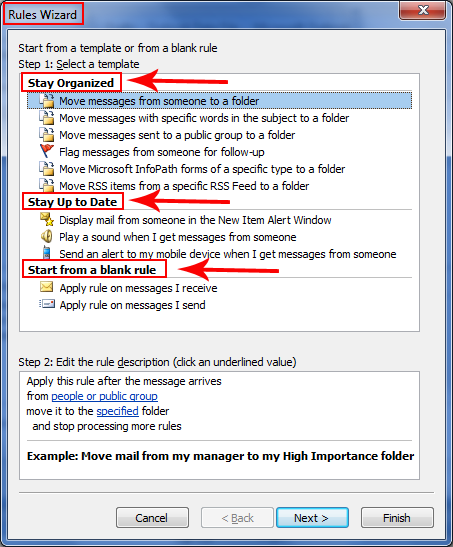
Step 4: Select the “template” required to create the Rule from categories and click Next.
(For e.g. if you want to move emails from your Team Lead with subject “Accounts Chart” to a folder when it arrives in your Inbox then you can do this by selecting apt conditions from Stay Organized and create a Rule for these emails.)
Step 5: As you select the template and click “Next” another window will pop up with conditions provided. You have to check the various conditions (under Step 1) and provide necessary details in “Edit the Rule description” by clicking the underlined values (under Step 2) provided below.
Provide the exceptions if any.
Step 6: As you click “Next” some more specifications will be available. You can provide a name to the “Rule (under Step1)” and also let the rule act on present messages. This can be done by checking the options “Run this Rule now on messages in Inbox” and “Turn on this Rule”.
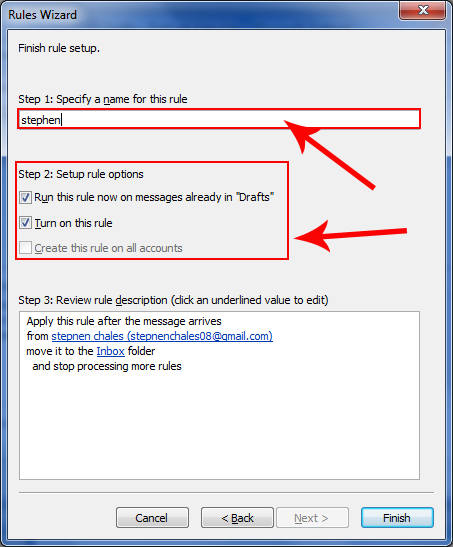
Step 7: In case you have “multiple accounts” and you want to apply this rule to all the accounts then you can also check the “Create this rule on all accounts”.
Conclusion
Rules can make the Outlook management more effective and also save your time and efforts. You can create many Rules likewise and can manage the emails sending and receiving. Take care of the fact that while applying rules, meeting requests, documents and task requests are also treated as messages and these can also sent to defined folders.
Once the item is moved to the folder other than mail folder it is possible that it will not work normally. For instance, if a message is moved to calendar folder new appointment will not be created. Otherwise this function works fine and can be availed by you. So, utilize this functionality and make the emailing more competent.