

MS Outlook does not provide any direct way of saving of adding contacts from senders’ or recipients’ list as contacts. But some smart techniques can be utilized to do this and this will not require any extra gadget or toolbox. Using “Import and Export Wizard”, CSV file and MS Excel we can achieve our target and add all email senders or recipients as contacts. This blog will cover step wise elaboration of this method which can be followed to add all the contacts.
Step 1: Procedure to Export: “From Name” & “From Address” to CSV
The most primary folder where all the emails are saved along with the recipients is the INBOX. So we will do this procedure with Inbox here, you can perform same process with any folder you want to. Follow the below mentioned steps to export From Name and Address from the emails of Inbox to a CSV file.
- Select folder like here we are choosing Inbox.
- Go to Import and Export Wizard;
- Outlook 2007 users can go to: File >> Import and Export
- Outlook 2010 users can go to: File >> Open >> Import
- Outlook 2013 users can go to: File >> Open & Export >> Import/Export
- Choose the option of Export to File.
- Here choose the option of Comma Separate Values.
- Select a folder location and a name for CSV file.
- Don’t forget to check the box with “Export “E-Mail messages” from folder: Inbox” option.
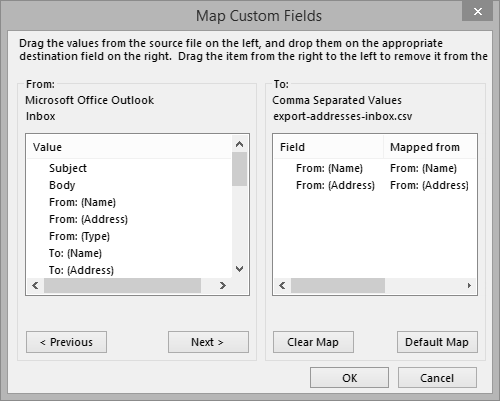
- Now click on Map Custom Fields and in this option, click “Clear Map”.
- Drag and Drop the needed fields to the “To” box. As we are here working on Inbox folder, our target will be From (Name) and From (Address).
- When done with all the mapping, Press OK and then click Finish.
- This will start the contact export procedure.
Step 2: Procedure to Remove Duplicate Contacts
Inbox or any other folder can have multiple emails from the same sender, and it is impossible to remember whether the contact has been added or not. So it is better to remove the duplicate contacts, for which you can follow the below mentioned steps;
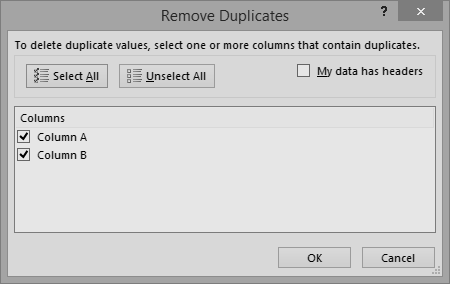
- Open the CSV file which we created in MS Excel.
Note: If the data we exported is saved in single column, you can utilize Data >> Text to Columns feature so that the two fields get saved in separate columns.
- Select the entire A and B columns, and on Data tab click on the option “Remove Duplicates”
- Click “OK” to Proceed.
Step 3: Remove Internal Exchange Address
Sometimes Exchange account is also configured and this means that some addresses belong to the Exchange application which are in x500 format. If you want to filter it out, you can do it by following the below mentioned process.
- First, select cell A1.
- Go to the Data tab, click Filter.
- Click on drop-down icon of cell B1.
- Choose: Text Filters-> Contains…
- Provide the condition.

- Click OK, and the filters will be applied to it.
- Press (CTRL+A) and copy them (CTRL+C).
- Open Excel and create new sheet of Excel.
- Now paste the copied data by clicking (CTRL+V).
Step 4: Manual Filtering and Arrangement
You can go through your CSV file and check the names and addresses manually. You can also delete any unnecessary contact or add up new contact if it is not present in the list. Now you can go to File option of your Excel file and click on Save As. This new file with filtered contacts can be saved with new name to avoid confusion and save it as .csv file.

Step 5: Procedure to Import CSV In Outlook
Now contacts are ready in a format which can be imported in MS Outlook application. To import these contacts follow the below steps;
- Go to Import and Export Wizard;
- Outlook 2007 users can go to: File >> Import and Export
- Outlook 2010 users can go to: File >> Open >> Import
- Outlook 2013 users can go to: File >> Open & Export >> Import/Export
- Select option of “Import from another Program or File”.
- Here select Comma Separated Values as an option.
- Now Browse and add the CSV file which was created in previous steps.
- Do the settings with the duplicate items.
- Select Contacts Folder to save CSV contacts.
- Don’t forget to check the option “Import “export-addresses-inbox-filtered.csv” into folder: Contacts”.
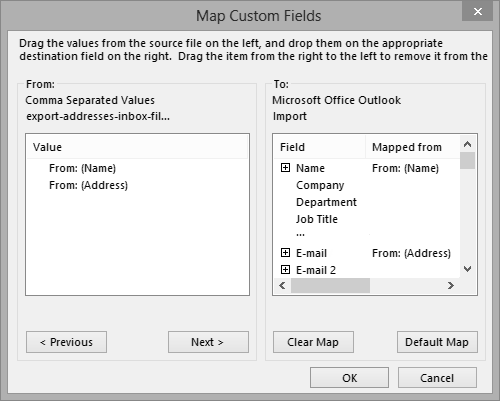
- Click on Map Custom Fields and click on option Clear Map in the same dialog box.
- Using drag and drop method, move fields from left to right in “To” box. These fields are; From (Name) -> Name and From (Address) -> E-mail.
- Click “OK” and then Finish initiating importing process.
Perform Same Procedure with Sent Items Folder
After Inbox, Sent Items is the email folder which has important contact list. You can perform same activity with the Sent Item folder and move contacts to CSV file which can be then imported to the Contacts folder. In case you have other folders with new contacts then they can be imported too. Remove the semicolon from the fields if you are exporting contacts from Sent Items.
Conclusion
In this way, you can easily add all email senders or recipients as contacts in batch. MS Outlook has no direct method to do so but have many options which can be utilized to mold the output and process as per our requirement. The process is easy but requires basic information of Excel and CSV file so as to maintain the column and row details and fields. You will not require to manually copy-paste the email ids and names and using Import/Export Wizard the exporting and importing of contacts will be done easily. In this way you can manage and organize the contacts for better Outlook communication.