

MS Outlook supports the feature to assign one or more categories to any Outlook item to make it easy to locate specific items by its users. Color Categories were introduced in Outlook 2007 by combining the colored flags with categories. Sometimes, the user needs to merge the master category list in an Outlook account with the list present on another computer. One of the possible solutions for the same purpose is to back up and merge our categories or to share categories between users, without overwriting the custom categories that are already present. The blog explains the procedure involved to create Backup for Microsoft Outlook Master Categories.
About Outlook’s Master Categories List
MS Outlook does not support the feature to import/export the Master category for sharing custom categories with others, other than by exporting the registry & overwriting the registry entry on other computers. Any category marked on an Outlook item but not in the Master category list is marked with ‘Not on the Master list’. The master category is only preferred if the company uses many custom categories. When the categories are listed under the master list, it is easy to select the right category for their items.
Stepwise procedure to back up Outlook’s Master Categories List
1.) Make a backup copy of Categories already in the Master List
- Open an Outlook item irrespective of any item type, but choosing contact will make it easier to locate and name it ‘Category Backup’ which will be at the start of the address book.
- Click on the Categorize button in the ribbon then select All Categories from the bottom of the menu.
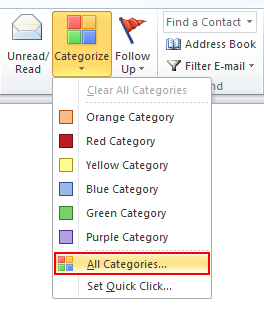
- A Color properties dialog will be opened displaying all the categories.
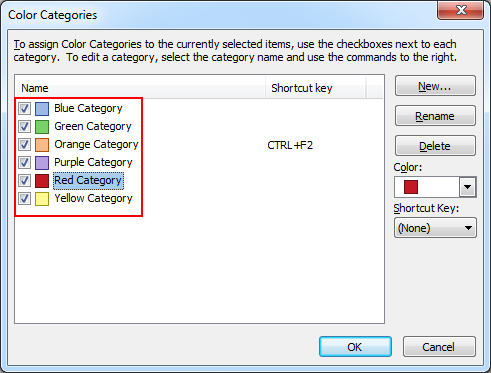
- Select all the desired categories in the list. We can do it by using the spacebar and the down arrow key to move through the list and select categories quickly.
- Click OK after selecting the categories and all of them will be added to the item.
- Before moving the PST file to a new computer or sharing the category with others, we will open this Outlook item, reopen the color categories dialog, and verify that all the selected categories are present.
2.) Add Categories to the Master List
For adding Categories to the Master List, we will use Outlook’s Upgrade to Color categories command to add them. This upgrade option will add the category names to the list and assign random colors. The user can change them later if they do not like the colors assigned by Outlook.
Upgrade to the Color Categories option can be enabled using the following steps:
- Right-click on the Outlook mailbox name
- Then, choose Data File properties from the bottom of the Menu.
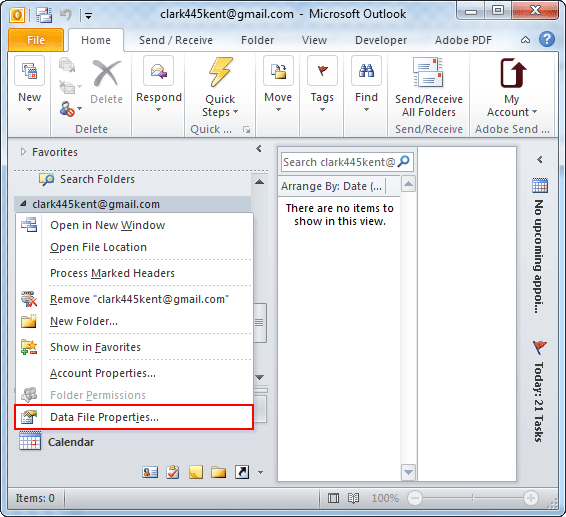
- Then, click on ‘Upgrade to Color Categories
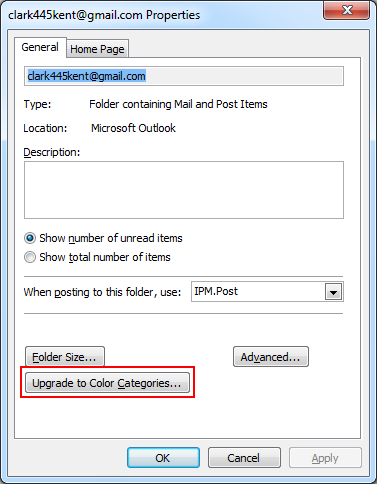
When the user enables the Upgrade option, Outlook goes through all of the items in the data files, adds the categories that are not present already in the master list and assigns a color to the category.
3.) Add several new categories at a time
If the user does not have an existing item with the categories assigned already in Outlook 2007 or 2010, he needs to add them one at a time using the category dialog, with one exception that the user can type or paste categories in the category field on the All Fields page in an open Contact form. This is the only Category field in Outlook 2007 or 2010 that accepts a comma-separated list of categories.
Once the list of Categories is added to the contact and saved. Use the Add to Color Category command to add the categories to the Master List.
Conclusion
The blog has been aimed at discussing the features of MS Outlook. Where users can categorize Outlook items making it easily recognizable. It further provides a solution to create Backup for Microsoft Outlook Master Categories. And merge the master category list with a list present in different computers without overwriting the custom categories already present.