MS Outlook is preferred by users due to its simplified features and functionality factors. Each and every function of Outlook provides ease to work and does not require any extra efforts of users. Here, in this section we will discuss about topic how to compose email in Outlook in simple steps.
These days’ emails are far better than paper mail because of its fast delivery options. Emails take time of a second to deliver to person and additionally, along with email users can send attachments too in the form of images, documents, sounds and even videos. In fact, being an email client, composing email is most frequent task that users perform in Outlook. Outlook offers almost 80% of its options in creating e-mail messages which is far more than any other tasks performed in it. Users can create either business or personal messages in their own way with the help of brilliant features provided by Outlook. Read the below section to know about all e-mail features provided by Outlook application.
Synopsis Of Topics Covered
- Composing a New Message in Outlook
- Applying Delivery Options
- Setting Appearance for Messages Created
- Inserting or Attaching any Items with Messages
- Adding Tracking to Newly Created Messages
- Security and Privacy of Messages
- Spelling and Grammar check, Online Research and Message Translation
Composing A New E-mail Message
How To Compose A New Email In Outlook 2010?
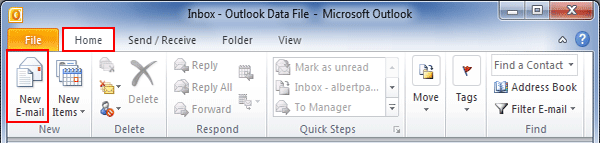
- Open Outlook and on the Home tab > New E-mail.
 There are also keyboard shortcuts for composing new email in Outlook: CTRL+SHFT+M.
 - Adding Recipients: Enter email address to which the email is to be sent i.e. in To, CC and BCC box. In the ‘Subject’ box type the subject of message as required.

- To add contacts to send newly created message, users have to click on ‘To’ option. Now to enter email addresses Outlook provides two options. One is either users can enter email addresses manually by typing it in To, CC and BCC boxes. Don’t forget to separate names with semicolon (;).

- Second is entering email addresses via contact list of PST file. For this users have to click on ‘To’ option provided for adding contacts, this will display a list of all contacts saved within Outlook account of user.
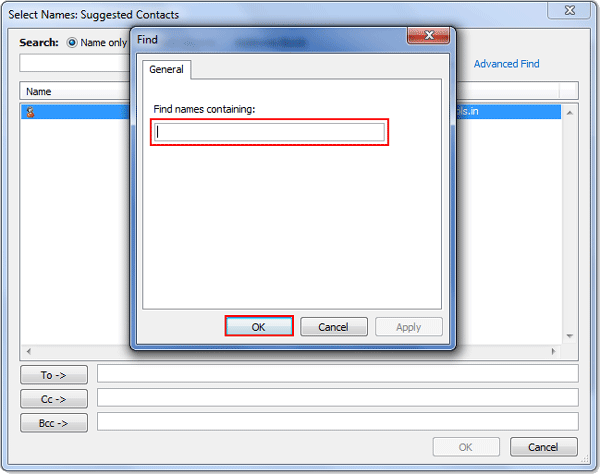
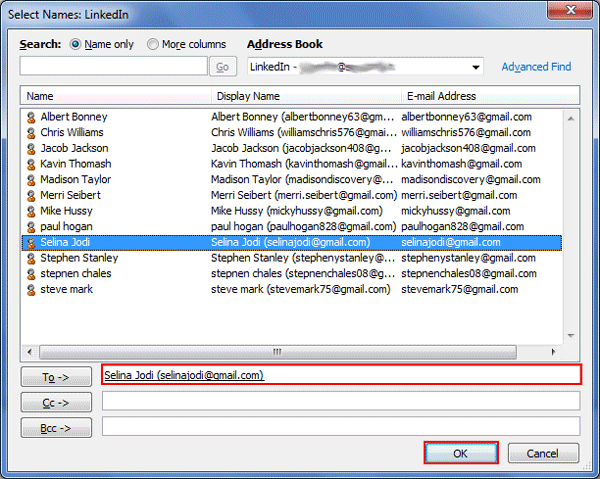 As seen in above figure all the list of contacts is visible to users now, select all required contacts simply by right clicking and dragging mouse cursor towards down. Now click on field into which they are to be entered and ‘Ok’ to proceed further.
 - Users can also filter contacts before entering them into message, using Search option provided at the top of the windows. “Name only” and “More columns” are provided to search specific contacts with name or any other information.

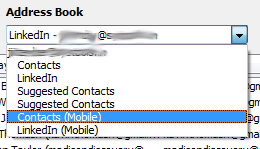
- Address Book options are also provided to choose the destination from where the contacts are to be added like address book, contacts from mobile, suggested contacts etc.
- “Advanced Find” option is also provided to find out names with specific details.
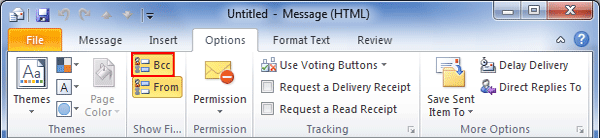
Note: In Outlook 2010 ‘BCC’ box is missing in recipients tab, thus in such case users have to turn on the ‘BCC’ box from ‘Options’ tab and click on BCC. Also users can check on ‘From’ option to show from whom the message has been received.
Applying Delivery Options
MS Outlook provides multiple options to set delivery of messages according to needs. Users can apply level of importance of message if it’s urgent or important, set expire date for messages those are less important and delay sending the message so that set messages can be send after some delay.
How To Assign Level Of Importance To Message?
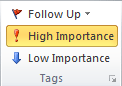
Before sending a message from Outlook account users can set its level of importance so that receiver before opening that particular message can give priority to that message accordingly. For this go to ‘Messages’ tab and from Tags option either click on ‘High Importance’ or ‘Low Importance’.
How To Set Expiration Date?
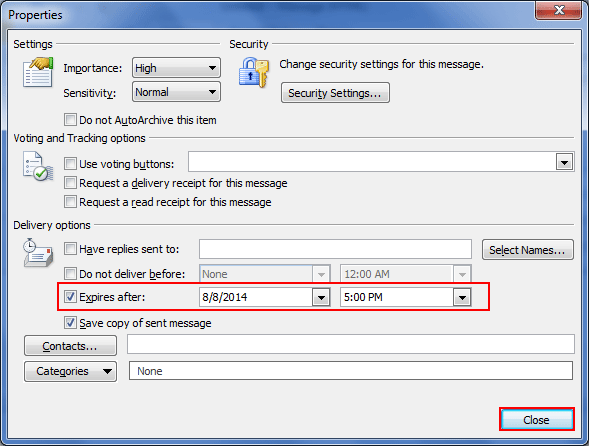
Outlook provides users with the facility of setting an expiry date for the messages they send to other user. Using which they can set dates for a particular message and when message exceeds specified date, then it prompts message like ‘This message is no longer valid’ when user try to open that message.
Note: This feature works only in Corporate environment, in case user use this to set expiry date for emails send to Gmail and Yahoo users, the messages will not expire.
Go to ‘Options’ tab and move your cursor to Tracking section. Now click on Drop down arrow as shown below:
![]()
Here fill the “expiration date” and click on “close”
Delay Sending Message Settings
Outlook also provides option to delay the delivery of either single message or all messages after clicking on ‘Send’ option regardless of email account type they use for communicating.
- Exchange Accounts users go to ‘Options’ > More Options > Delay Delivery.

- Now click on ‘Do not deliver Before’ option to set Delay sending message settings on single message.
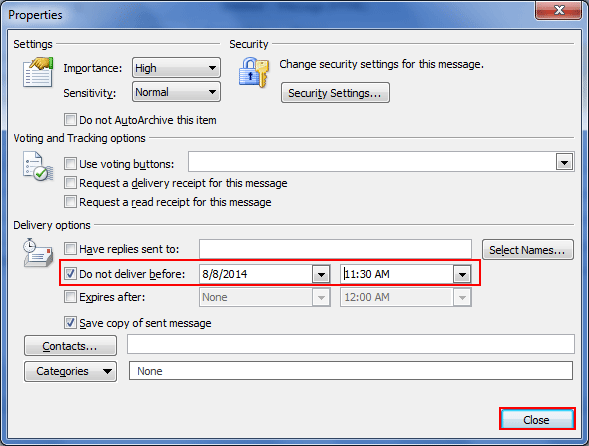
Note: The above method works only for single message now let us learn how to set Delay Sending message for all Outlook Messages.
For All Messages
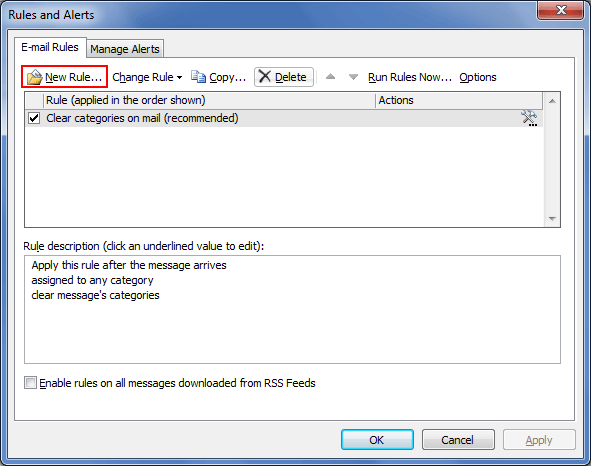
- From the main Outlook windows, go to “Home” tab and click on “Rules”. Now in Rules and Alerts dialog box, E-mail Rules click on New Rule.
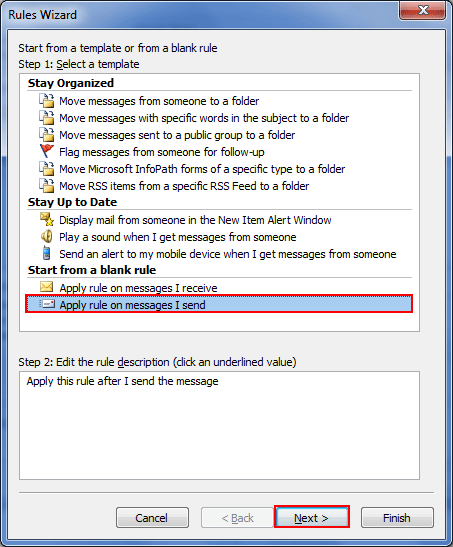
- Now select a template from Start from a blank rule and click on Apply Rule on messages I Send. Click ‘Next’ to proceed further.
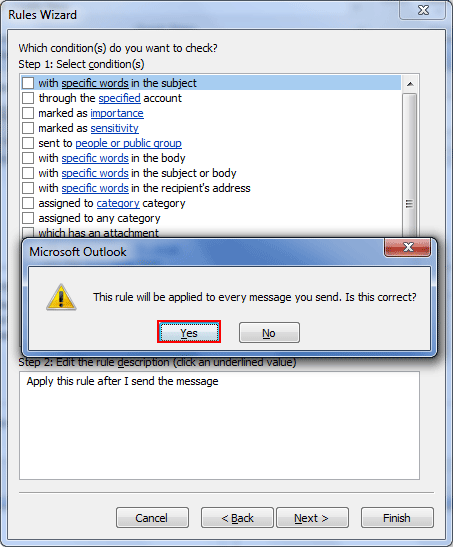
- Check or uncheck the messages you want to apply settings for and click on ‘Next’. If users don’t select any of the conditions, Outlook will automatically appears a message confirming that this rule will be applied to all messages, click on “Yes” to proceed.
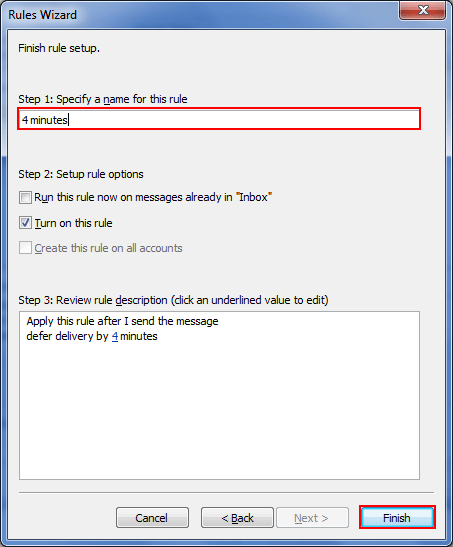
- Now select ‘Defer delivery by number of minutes’ check box under step 1 and in step 2 click on ‘A number of minutes’.
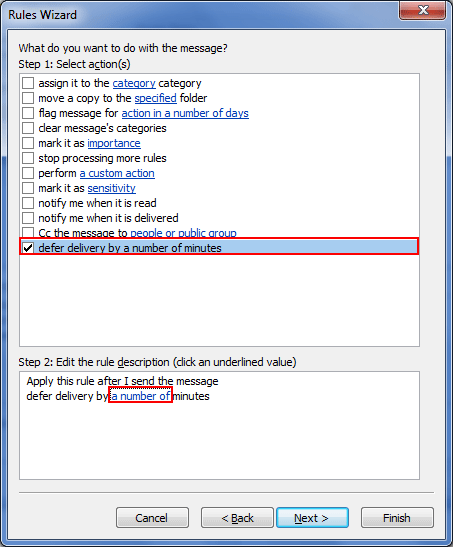
- Choose the required amount of time by which the message should be delayed and click on ‘Ok’ and then click ‘Next’ to proceed.
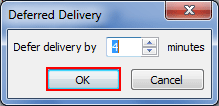
- Now name the rule and click on ‘Turn on this rule’ from dialog box. Click on ‘Finish’ to close the delay sending messages rule settings.
Note: This procedure will delays all sent messages that are sent in set number of minutes. MS Outlook must be in running mode so that messages can be sent properly.
Setting Appearance For Messages Created
Outlook also provides settings for changing the appearance of your messages like users can add background color to message, change the font of text, add graphics, table, signature, symbols and can change the theme also. Let us learn one by one each of them to perform in Outlook 2010.
Add Background Color
Users can add background color, texture, gradient, pattern or picture to message in just simple clicks. To add a background color to message just go to Options tab, now under Themes options, click on Page Color and fill the required color to background of the message.
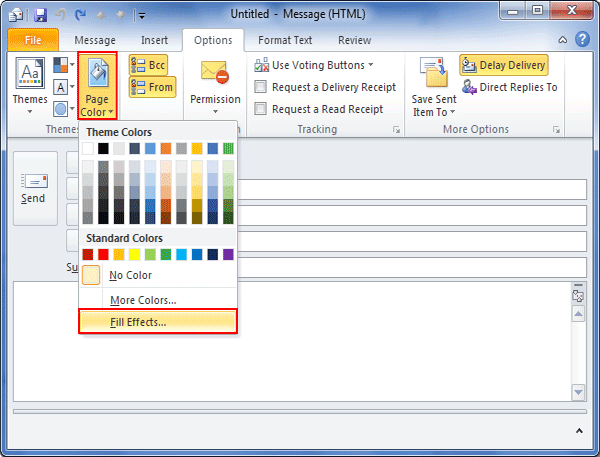
To add gradient, texture, picture or pattern just click on Fill Effects and apply necessary settings as needed.
Changing Font Size
Users can also apply necessary font formatting as their requirements from ‘Message tab’ itself. Just select the font size, style, color and text highlighting from the basic text group.

Adding Graphics
Adding graphics to message grab the attention of receiver therefore, Outlook provides options to add graphics to your message as attachment or picture as instructed in the above section. Go to ‘Insert’ tab and under Illustrations group click any one of the option:
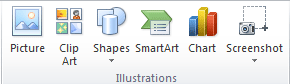
- Picture from File: In this option, users can insert the picture into newly created message saved on hard drive of user. Browse the location of picture and click on Insert to add image to message.
- SmartArt: Under this option, users can choose a layout for a SmartArt graphic and then ‘Ok’ to proceed. Moreover, users can also click on SmartArt graphic to add text to message in Outlook.
- Chart: Users can choose a chart type from the options and can insert into message to send to other user.
- Shapes: Click on ‘shape’ to insert shape of any type into message and send it to users for business purpose.
- Word Art: Word Art is again the option from where users can insert images or clips to send for their purposes.
Adding Numbers Or Bullets In Message
Outlook also provides option to add bullets or numbers to list of items into messages. For this just type * and press Enter, it will add a bullet to sentence. Pressing enter after completing sentence will automatically add a bullet to the next sentence.
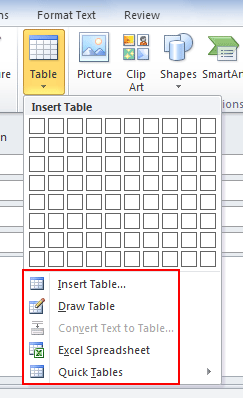
Adding Table
Outlook also provides option to add table to present information in the form of tables. Take your cursor to place where you want to insert a table and click either on Insert table or draw table.
- Either point out your cursor to Quick tables or chooses the table required by you. Now replace the data into table as per your requirements.
- Or click on table grid to insert rows and columns according to your needs.
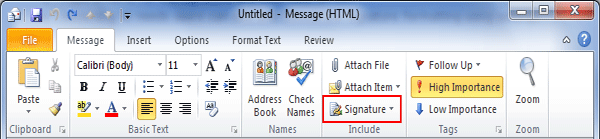
Adding Signatures To New Emails
Using Outlook account users can create their personal signature as your identity to add to your outgoing messages. Or they can also insert signature manually into separate outgoing message.
Insert Automatically To All Outgoing Messages
- From the ‘Message’ tab from Include group, click on Signature.
Note: Signatures can also be inserted by users when they open any message, in the Reply, Reply to all and Forward options there are also an option for inserting signature. - Type a name for the signature and then click on Ok.
- According to needs users can edit and format the signature formatting using settings options.
Insert a signature manually
To insert a signature manually into outgoing message go to Message tab > Include group > Click on Signature > now select the signature as you need.
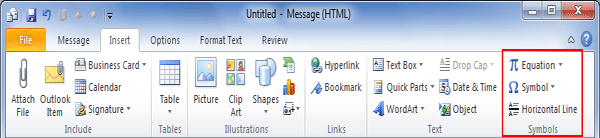
Adding Symbols, Equations and Horizontal lines
- Using Outlook symbol command users can enter the symbols those are not visible in keyboard keys. They can enter the symbols like ¼, ©, Dash (-) or ellipsis (…) and Unicode characters.
- The equation command in Outlook allows users to enter complex equations hassle free.
- Moreover, the Horizontal line command let users to break messages into smaller sections. Go to Insert tab > Symbols group > Equation, Symbol/Horizontal Line.
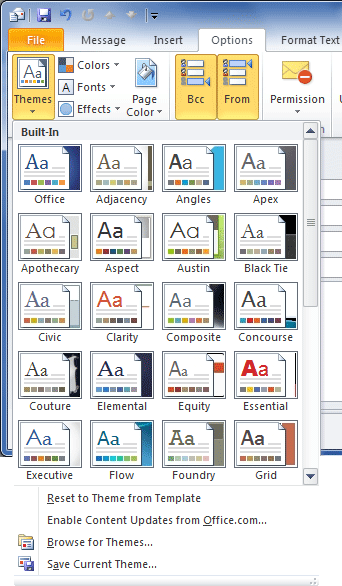
Changing the Theme
Theme settings in Outlook let users design professional as well as personal messages easily. Themes applied to message document customize the colors at background, graphics, body and heading style etc. To insert a Theme in your message, Go to Message Options tab > Themes group > Themes.
Inserting Or Attaching Any Items With Messages
Attachments are big part of emails and Outlook provides different options to add attachments as documents, images and other files, insert links and Insert an electronic business card  along with a message.
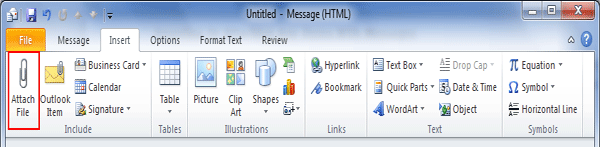
How To Add Attachments?
While composing email, users can attach a file with it by going to Message tab > Include group > Click Attach File.
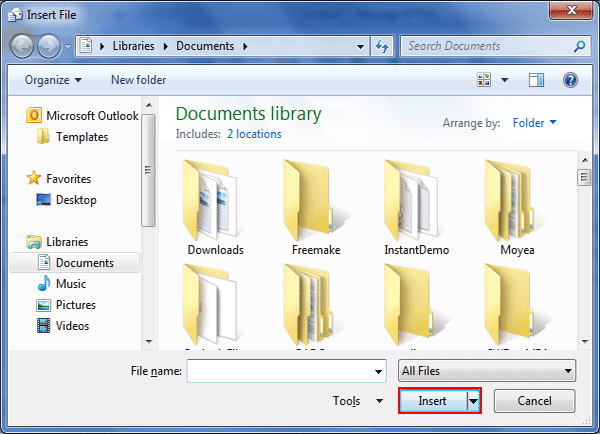
After clicking on ‘Attach file’ option, select a file which is to be attached with message and click on Insert.
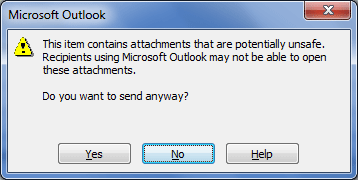
Note: By default Outlook does not support few formats that are considered as bugs such as .bat, .exe, .vbs, and .js files. Thus, if tries to attach these files as attachments then, Outlook will prompt a message that these files are unsafe to attach, click on ‘Yes’ if you need to attach these files in regardless of this message, else click on ‘No’ to cancel this process.
Useful Tip: Using Outlook users can attach multiple files as attachments with a message depending upon the size of files.
Attachments appear in Outlook message depending upon the format that attachment contain.
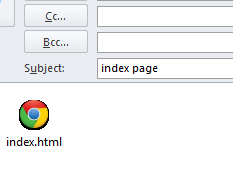
- If Outlook message is in HTML format then in such case attachments appear in box below the subject of email as shown below:

- If email message is in RTF (Rich text format) then attachments appear in body of Outlook message. It appears as embedded attachment, but it is still a separate attachment in message.
- The format of message can be seen at title bar of the message as indicated below:


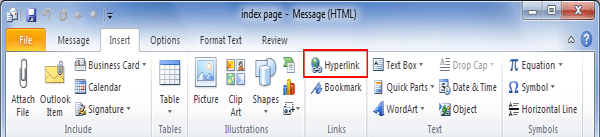
How To Insert A Link?
Hyperlinks can also be inserted into Outlook messages by following under mentioned processes:
Insert a hyperlink from options: Go to ‘Insert’ tab > Links group > Hyperlink.
MS Windows Outlook supports long file names for hyperlinking, however if user insert a link name with spaces, in such case Outlook provides hyperlink to first few characters of link. Which as a result turns into invalid link, therefore users must use opening and closing chevron (<>) to insert a right hyperlink to message. Outlook supports all text for hyperlinking that is inside the chevrons and recipient also receives the complete link at end.
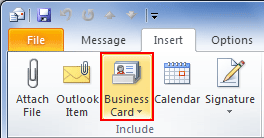
How To Include An Electronic Business Card?
Electronic Business cards are best way to share and store contact information of user. These cards are easy to attach and are easily recognizable by end user.
- To insert a Business card to a message click on ‘Insert’ tab > Business Card > Choose a name from the list and press ‘Enter’
- If Outlook does not display any information then click on ‘Other Business Card’ to choose contacts from list displayed at screen.

Additional Information
- Outlook display’s 10 contact names in the Business Card menu that can be inserted as Electronic Business Cards in to newly created message.
- Users can insert more than one Electronic Business card in Outlook message.
- In order to distinguish between duplicate names on Business card menu, users are required to go to ‘Other Business cards’ option. In the ‘Insert Business card’ dialog box, Outlook provides ‘More information’ option along with ‘Card preview’ option to check for duplicate cards in message.
- If a Business card is drag and inserted from Business Cards view into newly created message then in such case only a .vcf file is included in message sent to recipient. The attached VCF file contains all the information of user according to the format that users save contacts in Outlook and can be saved in their contacts lists easily. Outlook 2007 and above versions Electronic Business Card is visible to users in contact form.
Adding Tracking To Newly Created Messages
Outlook 2010 provides ‘Follow up’ options that provide better way to manage emails data. Users can flag email message as per to the requirement of recipients. Users can flag email message according to date or can also add reminder to message to check and reply to significant messages accordingly.
To insert a flag on message do the following:
- Message tab > Options group > Follow Up > Select a due date/Select Custom.
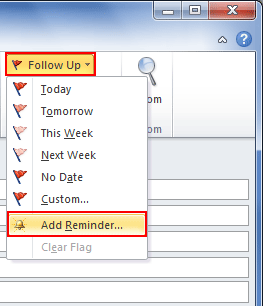
- To set a reminder: Message > Options > Follow Up > Add Reminder
Adding Voting buttons
Microsoft Outlook when used with Exchange Server 2000, 2003 and 2007 then this feature is used. To include voting buttons in an Outlook message go to Message > Format group > Use Voting Buttons.
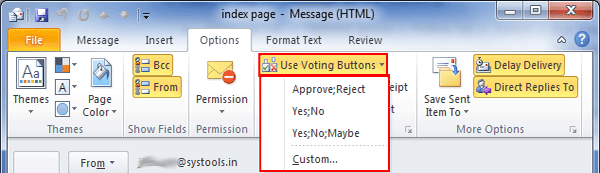
- Click on Yes; No to tell Outlook that it is either yes or no, which is good way to take opinion of clients quickly.
- Clicking on Yes; No; Maybe are true indications that that you are not sure about conclusion and can offer you a response.
- Custom is creating own way of voting i.e. defining a reason or offering a unique way of taking response from users.

- As shown in above figure when Message dialogue box appears, select the Use voting buttons from voting and tracking options. Also users can select and delete the default button names and can type the desired text by separating each name with semicolons.
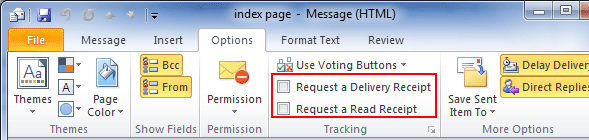
How To Get A Delivery/Read Receipt
Outlook also provides options to trace the reading or delivery message options to know whether message is received or not. A delivery receipt reminds that message has been delivered to user and a read receipt informs that message is read by user. To do:
- Message > Options > Under Tracking box > Check on Request a delivery/Read Receipt
Security And Privacy Of Messages
To improve the security of email messages each version of Outlook provides separate options to perform these tasks:
- Insert digital sign to email message
- Encrypt your message
- Control over sent message
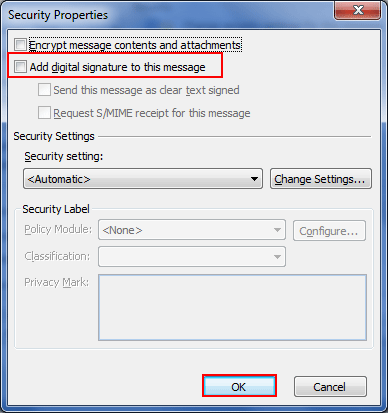
How To Insert a Digital Sign To Email Message?
To insert a digital message to email, user must have digital certificate or digital ID approved by Microsoft Office online. To insert a digital signature, go to Options > Under Tracking options click on Arrow situated at corner. Now under ‘Properties’ settings click on ‘Security Settings’ options to insert digital signatures.
![]()
Now click on “Add digital signature to this message” to insert signature desirably.
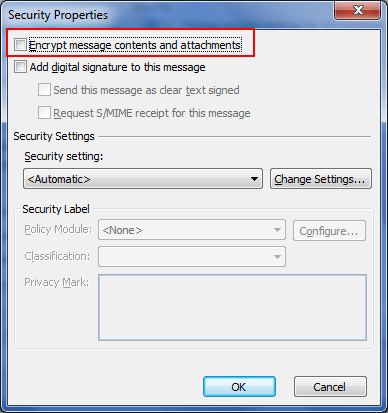
How To Encrypt A Message?
An Outgoing message should not be misused therefore; Outlook provides options to encrypt an email using certain options. Once encrypted, Outlook message sent to user will be in scrambled text instead of readable text.
- Message tab > Options group > Tracking > Properties > Security Settings > “Encrypt message contents and attachments”.
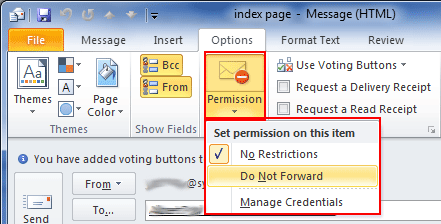
Setting Permission Over Sent Message
There is IRM (Information Rights Management) service in Outlook that provides option to specify permission to email messages. This feature helps to protect confidential information from being misused like printed, forwarded or copied by unauthorized users.
- To set permissions on Message > Options > Permission
Spelling And Grammar Check, Online Research And Message Translation
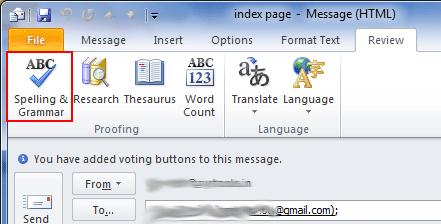
Spelling and Grammar Check
MS Outlook provides options to check spelling and grammar automatically as user work with it. It alerts user with wavy red and green lines indicate that there is grammar and spelling mistake in the content they write.
- To check if your message contains any error or not go to Review > Proofing > Spelling & Grammar check.
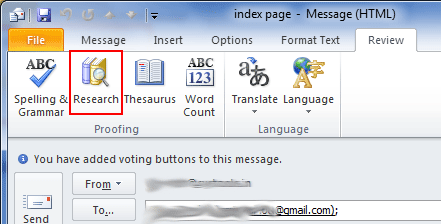
Online Research
Using Outlook ‘Research’ options users can search reference material, dictionary etc in online market to compete with outside world. Just select any term you want to research and perform these steps:
- Review tab > Proofing > Research
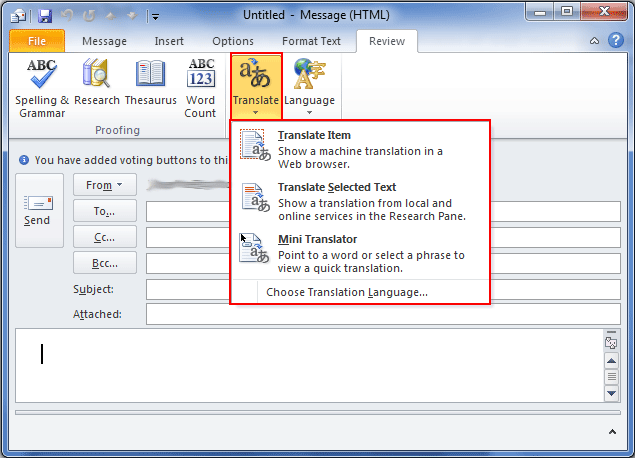
Translating Text
Outlook offers multiple options to look up words and phrases of your message in other language dictionary. Moreover, users can also translate words, sentence or whole document into Outlook using machine translator online.
To do this just select the text you want to translate and follow under mentioned steps:
- Go to ‘Review’ Tab > Language box > Choose Translate > Ok