

The process to convert from POP3 account to IMAP is explained here but the fact is that conversion is not possible directly. Moreover, when using a Post Office Protocol (POP) account, the account settings of it is grayed out as shown in the figure below. 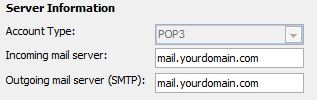
However, the POP3 account can be first removed then the Internet Message Access Protocol (IMAP) account can be added and finally the mail folders can be transferred to perform the conversion process. Though indirectly, the conversion procedure from POP3 to IMAP can be accomplished as re-configuration in the IMAP account is not that tough. But care should be taken so that data is not lost. The figure below shows a POP3 configured account, where the account type i.e. POP3 is disabled and seems that it cannot be altered.
Know the Steps to Achieve POP3 Conversion into IMAP
The below three steps should be followed sequentially to convert from a POP3 account to an IMAP account.
- Eliminate the present POP3 account.
- Add the IMAP account.
- Transfer mail folders (provided there is space on the server)
Note – Before proceeding towards the process that should be followed to accomplish POP to IMAP conversion, it should be well-known that the existing set of folders in Outlook PST file that was once used for POP3 account cannot be removed or rather should not be removed. The reason being, an IMAP account supports folders that contains emails only and not other folders. Hence, an additional PST file is required for the storage of other data items such as contacts, calendar, journals, tasks, notes, etc. In addition, some configuration needs to be done to get Sent Items emails on to the Sent Items folder of IMAP.
Step 1: Eradicate the already configured POP3 account
As mentioned above it is clear that the very first step is to remove the current POP3 account to avert the formation of duplicate items. Duplicates can be created if the data items are not deleted and once again the items are downloaded from the server to the mail client.
Note – It should be noted that the data items such as emails, contacts, calendar and other items that have already been downloaded do not get deleted on removing the POP3 account. Still it is advised that a proper backup of the Outlook PST file be created so that if something goes wrong or out of the way in the process of data transfer, backup can be utilized to regain the data. Moreover, creating backup never creates trouble. The Post Office Protocol version 3 can be removed through Account settings from the desktop mail program. Though, almost the same there is a bit difference in the process depending on the version of Outlook. The methods for different Outlook releases to eradicate POP3 account are shown below:
In MS Outlook edition 2003:
- Open Outlook >> Click onTools tab >> Click E-mail Accounts >> Press the button ‘Next’ >> Select the POP3 account to be removed >> Finally press the button Remove.
In Outlook version 2007:
- Open Outlook program >> Click Tools >> Click Account Settings >> Select the POP3 account to be erased >> Click tab Remove.
In Outlook 2010, 2013 & 2016:
- Open Outlook client >> Open File >> Section Info >> Account Settings >> Account Settings… >> Select POP3 account to be eradicated >> Finally click the Remove button.
Step 2: Add the IMAP account
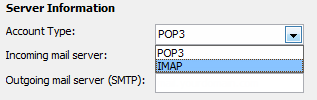
The second step is to add the mailbox as an IMAP account which can be done in the same dialog box used in Step 1. In Outlook 2016, 2013, 2010, and 2007 the ‘Auto Account Setup wizard’ can be used for ease. This is because the process is automatic where the user just needs to fill in credentials like name, email address, and password. In doing this, Outlook itself tries to find the settings needed for the account.
However, if the process fails or it finds the POP3 settings then the IMAP account can be added manually with the provided option ‘Manually configure server settings or additional server types’. When server settings to add an IMAP account are done, the server configuration settings should be obtained beforehand. If not known the user’s email provider should be contacted for the details.
Step 3: Transfer the mail folders
The third and final step involves the transfer of the email folders after the POP3 account has been removed and the IMAP account added. If relevant space exists in the mailbox users can transfer the current emails and folder structure that was previously downloaded through POP3, to the IMAP account. However, it is an optional feature and can be opted for only when required.
Know how to transfer the data items – Two methods can be employed to transfer the mail folders or individual emails to have them stored on the IMAP server.
- The wanted email/ mail folder should be selected and either copy or move command should be initiated.
- Secondly, the drag-and-drop method can be utilized.
In Outlook, when the drag and drop method is used via the right button of the mouse two options, move and copy are provided to transfer the selected items/ folder. These are the steps to convert from a POP3 account to IMAP though not directly.
- Imp Note 1 – The Sent Items or Inbox folders cannot be copied or moved at any other location as they are special folders. However, individual email messages can be selected and transferred from those folders to the desired location.
- Imp Note 2 – If you had your POP3 account configured to leave a copy on the server and sorted your mail into folders, you’ll probably first have to empty your IMAP inbox to prevent duplicates.
Difference between IMAP and POP Account
The choice of conversion depends on the user’s choice. However, unlike POP an IMAP account completely synchronizes between the desktop mail program (here MS Outlook) and the server. Due to this when IMAP server settings are done emails are again available in the web interface of the mailbox with an identical folder hierarchy. Moreover, the read/ unread status of any received emails is automatically updated on all devices be it PC, Tablet, Smartphone, or any other device.